How to Test Antivirus Working or Not


Protection of our computer from virus is very important, because it will be effect to our komputer healt. Healty computer will make it long life and keep away our important file from damage by virus.

But.. so far have you sure that your Antivirus already work as well as you think? Or have you sure that there is no something corrupt with your Antivirus file? We must know it before we feel sorry for computer damage caused by uncorrect Antivirus work.

So test it first, because Antivirus is one program that very important for computer security.

TRICKS:

How to test antivirus tips? It’s not good and wise method if you test your Antivirus using real virus, because it will be dangerous for your computer if your Antivirus doesn't work.

One of the famouse and right method too test Antivirus is using Eicar Test file. Eicar Test file is safety file to test Antivirus that will be read as virus by Antivirus, but actually this file not contain virus code at all. It's just ASCII code. In simple word this file is not virus. So this file is not dangerous for your computer.

Here the step, first open Notepad program:
Start ---> All Program ---> Accesories ---> Notepad

Then copy the caracter code below to Notepad Sreen:

X5O!P%@AP[4\PZX54(P^)7CC)7}$EICAR-STANDARD-ANTIVIRUS-TEST-FILE!$H+H*

See the picture below:


Save that file using name EICAR.EXE

For Antivirus that working well, It's file will be detect as virus automatically. But if it’s not, it's mean your Antivirus doesn't work.

What's next if your Antivirus can't read that Eicar Test file? First, check again about your Antivirus protection configuration. Make sure that configuration already correct. If it still can work, maybe it' caused by corrupt file when installation or update the Antivirus. It's better if we try to reinstall again.

If still doesn't work? Of course... It'll better if we change the Antivirus.

Change Desktop Icon Space in Vista


Besides change icon Vista size, to make our Window Vista desktop background became more good looking, we have to change space between one icon to each other. Because if we make icon Vista smaller, space between icon became too much space.

It will be better if we reduce it's space even horisontal or vertical. With add desktop icon density, will reduse space that it's use at desktop. here the tricks!
Go to control panel..
Start ---> Control panel.

TRICKS
USING CONTROL PANEL DEFAULT VISTA

Choose "Appearance and Personalization"

Next, choose "Personalization"

Next step, "Window color and Appearance" menu

Find "Open classic appearance properties for more color options" below

Appearance setting window will open, and click "Advance" button

And here we go that our looking for, Appearance setting window, get dropdown menu item and choose "Icon spacing (Horizontal)" or "Icon spacing (Vertical)"

Fill the size that you want too, than click OK and apply. Look the effect to your Icon dekstop Vista spacing. Change it into space that suitable with your wish.

TRICKS
USING CONTROL PANEL CLASIC VIEW


Using control panel in Classic View more easy, because you will direct see "Personalization" menu on the first page. On next step just following menu like using Control panel default Vista above. So now you can manage your desktop icon space as like as you want!

Change Desktop Icon Size in Vista


Maybe this how to tips and tricks is just little tricks for common user of Window Vista. But it is not for new user of Window Vista like I used to.

Window Vista give a big of default desktop icon size. It's mean that if We install more software, tools or game with desktop icon it will take more and more.. a lot of space at our Window Vista background.

It will became more problem for Somebody that very like to install new software at their PC. Of course with to much big desktop icon, our computer background or wallpaper became looks very dirty and to much waste I mean. Even actualy that icon are not a waste but important software for us. How about our favorite wallpaper? Of course it will become difficult to see.

Just looks this my Window Vista desktop background before, below!

TRICKS
Actually Window Vista diferent than Window XP. Window Vista completed with simple way to change desktop icon size. The formula is:

PRESSING CTRL+SCROLL MOUSE

Just Pressing your Ctrl button and scroll your mouse up or down, and chose the icon size according your wish.
So simple isn't it?

And here we go, my lovely PC has simple, clean and elegant desktop icon.
So good looking for me!

It will be better if you also change space between one icon to each other in order to make them more rapid.
And looks.. The desktop Wallpaper also display very well. I like it looks very much!

Unhide Folders (Show Missing Folders Option)


"One day when I will open my private file that already I change to hidden file, I was shock. Because when I open folder option, I didn't find folder option button on Window Explorer. Of course this is become problem, because how can I open my file, if I can to show up my hidden file through folder option? My Folder options is missing!"

WHY FOLDER OPTIONS MISSING?
Folder option missing usually cause by virus. One of it is by virus Brontox. Everyday virus became more sophisticated. So don't forget to upgrade your Antivirus regularly. This virus attack Folder Options and hide it. So We can't open file that already We hide.

Actually or Fortunately this Folder Options isn't really missing. It's only hide by Virus. So We just have to show up again by one of steps bellow!

TRICKS 1

This is the easiest step. Try to scan your computer by your Antivirus, than restart the computer. This usually works but sometimes not. As long as I know Pcmav, Ansav and Smadav Antivirus work well in this case. How about your Antivirus?

If doesn't work, don't worry it's not the end of world, just follow the second tricks!

TRICKS 2

Open "Run" menu.
Start --->Run
Then type "GPEDIT.MSC" to open Group Policy Window, see the picture bellow!


Now we already open Group Policy Window. than click:

User Configuration ----> Administrative Templates ----> Window Components ---->Windows Explorer ----> Removes the Folder Options menu item....

see the picture below!


Have you find thats item? just click it and will show window like picture below:

Check menu "Disabled" than "Apply" to make your Folder Options came back. Restart computer if there is no direct effect!

TRICKS 3

Last tricks is using Registry Editor.
Open "Run"
Start ----> Run
Then type "REGEDIT" like picture below:

After Registry Editor Window show up, click the item below:

HKEY_CURRENT_USER ----> Software ---> Microsoft ---->
Window -----> Current Version ----> Policies ----> Explorer

Find item " NoFolderOptions" set the value to 0 (zero)

If you don't find that item, just make it your self, by

Right click mouse on empty area ----> New ---> DWORD Value
then just type it like picture above!
Restart the computer

How? Is it works?? Congratulations You get your Folder Options again!

Manage Startup Programs in Computer


Did You ever see that Your Computer has too many program running when booting up (starting computer)? I mean including programs that You don't want to running yet. Starting unnecesary (too many) program when booting up, make Our computer become to busy. The bad effect is make Our computer running slowly, especially for computer that has low specification on hardware.
Of course it's make You become busy too, becouse You must closed unnecesary open program first, before You can efective to use Your computer.

So it's become important to know tips how to manage Our computer startup program. This is the basic tricks for junior computer user.

TRICKS:

USING WINDOW PROGRAM TOOLS

In Window Vista, first go to Start ---> Control Panel (classic view) ----> Administrative Tools ---> System Configuration
OR
Using express search in Vista
Start ---> type "System Configuration" on search column, then short and press Enter.

this window will appear "System Configuration Window". Click tab "Startup".


Final step is You just give uncheck to the program that you don't want to run when booting up, it will turn off unchecked program when Your computer startup. And the opposite, if You want to turn on the program, simply, just give check to the program.

After that restart Your computer and watch the result.

USING ADDED PROGRAM/SOFTWARE/TOOLS

A lot of program completed with this application that can help you to manage startup program easily. Below is just example software that I use. Remember... below is just review the program that I have know, if you have better program, its up to You.

FREE SOFTWARE

YOUR CLEANER 1.10
This is freeware tools, so You can use it free without pay.
Very compatible for people like Me that has motto "Free is better than the best!" (he...he.. he..just kidding!)
The menu is "Autorun", here we can manage Our startup.

You can get this program for free from official website.

PAY SOFTWARE

XP REPAIR PRO
XP repair Pro has menu "Startup Program Manager". But it's not freeware, you must buy it on their official website.


ASHAMPOO WINOPTIMIZER
One of the most I like program is Ashampoo Winoptimizer 6. This software isn't freeware too. If want to get it we must buy full version of it first.

Menu on this software, located at Favorites ---> StartUp Tuner ---> Services ---> Autostart Entries


UNIBLUE SPEEDUP MYPC 2009
This program also necessary to consider. This program is not freeware.
Menu on this software is clicks tab "Optimization" ---> Applications ---> Startup Manager


Well... it's easy to manage StartUp program of our computer isn't it? One more time, Software above just My review, decision to use it is up to You.. or You have better solution? please leave Your commentary.

Paypal Account to Local Bank Transfer


Here is an easy tips to withdraw money from Paypal to a local bank account. Actually this method is fairly easy and almost the same for all local banks. First, consider the following important note:
  • Make sure that your name at your Paypal account is the same with your name at your local bank account. For example, if name at your local bank account is Marco Angelina Samaraan, so your name at Paypal account at least is Marco Samaraan (Paypal need first name and last name). If not, then your withdrawal will fail and you get fined $ 5.
  • Make sure that your Paypal account already verified.
ADD YOUR BANK ACCOUNT NUMBER AT PAYPAL
The first step is add your bank account number (account purposes to withdraw) to Paypal. Find and click this menu from your Paypalaccount:

Profile --> Add/Edit Bank Account -->Add

See the picture below:


Fill in the fields above correctly. For the column "bank code", you can look at the menu "what's this?" in accordance with your bank. Then click "continue", and complete until finish.

PROCESS OF WITHDRAWAL
Start process of withdrawal from your Paypal account as below:

Withdraw --> Withdraw funds to your bank account

Then fill in the amount of money would you pull from your Paypal account to your local bank account. To withdraw money from under $ 150, you will be charged $ 2. If above this amount then the withdrawal process is free. There is also a tool for converting currencies, according to the currency you want. Look at the picture below.


Complete the process until finished. Process transactions that you do can be seen from the type of transaction in your Paypal account. That type of transaction withdraw to bank accounts, with the status of pending.

The process withdraw to bank account according Paypal explanations will lasts about 3 until 4 business day. However, the process can be faster.

Keep in mind also that if you change the status of pending transactions to complete, not necessarily the money transfer has been entered into your bank account. But the process is still ongoing. But you do not need to worry, wait a while longer in a matter of hours, up to transfer money from Paypal has been entered into your bank account.

How to Create YahooMail or Ymail Account


Aside from being a search engine, Yahoo also provides email services that can be used free of charge. Even Yahoo email is one of the many email users around the world. Where the word endings for an email from Yahoo can be seen from the suffix of the email said @yahoo.com, @ymail.com and @rocketmail.com. The three kinds of suffix emails from Yahoo was the same. Perhaps the naming is intended to provide the opportunity for Internet users to more freely choose Yahoo email name with three diferrent suffix name.

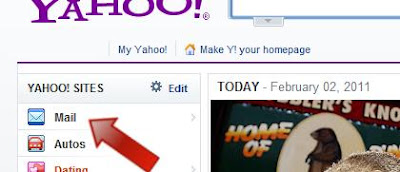
To make the email is actually quite easy, namely through a yahoo address search engines, yahoo.com. Go to the yahoo page, then you can find menu Yahoo sites in the upper left of the page. click and enter mail menu.


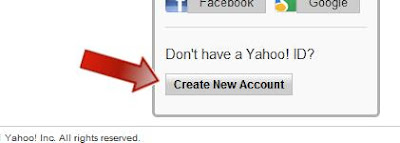
After that a new page will appear to sign into the Yahoo account. But because you do not have a Yahoo account, then you must make it first, through the "Create New Account" button, which is usually located on the top or at the bottom, as shown in the picture below.


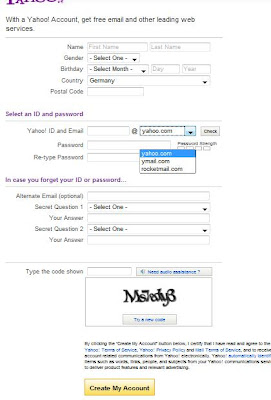
After that you will find a page that asks you to input your data to make Yahoo email. Fill in the requested columns in accordance with your data.


After you complete these data, then click the "Create My Account" located on the bottom of the page. Here are some important notes you should consider in filling your data:
  • For date of birth, Yahoo only allow adults. So Yahoo may reject the making of this email if the perceived age of the person is less.
  • At the time of filling secret question, give a plausible answer. If not, Yahoo will also deny your account setup.
  • There are three choices of suffix, choose one that is available and you like. For example, if you like to wear name michael@yahoo.com but not available, you can try with another suffix, such michael@ymail.com.
  • Fill in the captcha code correctly. If not successful try again.
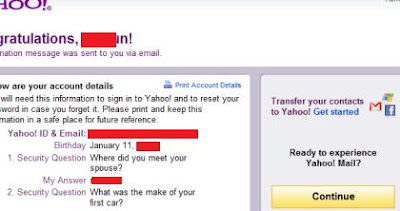
If you have successfully created your Yahoo email, then the welcome page will appear. As the picture below.


Continue with the next step, by clicking the button "Continue", to get into your Yahoo email which is already finished.


There are so many functions that your Yahoo email account is. Among them are can be used to log in in Yahoo messenger and register on the Yahoo group. If you've finished do not forget to log out. Good luck.

How to Change Gmail Password Googlemail


Maybe for some reason, you need tips to change the email password of your Google account. Could be because you feel your Gmail password is less secure now, so you want to turn it into more secure. If you are still confused to do so, here we give the tip.

First, of course you have to sign in and enter into your Gmail account. Then look at the menu at the top right at your Gmail account, and find the "settings" menu. Click on the menu and you will go to your Gmail settings menu page.


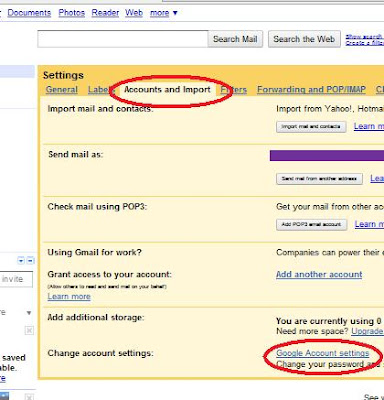
After that, choose the tab or menu "Accounts and Import", and find the menu "Google account settings" at the bottom, like the picture below. Here we can find menu to change the password.


At Google account settings page, find Personal Setting menu. In the personal settings menu you will see that we are looking for, namely "Changing your password". Click and go to that page to change your password.


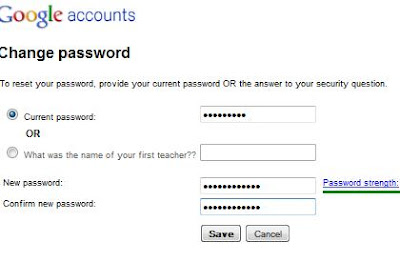
To change your password, you just enter your password which is now active in the "current password" field, and also enter your new Gmail password twice in the fields.


After that click "Save". Well, you finally success to change your Gmail password. Hopefully these tips useful for you.

How to Create GoogleMail or GMail Account


Here are tips on how to create an email from Google or known by the name Gmail. As we know, emails can be spelled out a basic requirement of internet users. Maybe this is also recognized by Google, so they also provide email services, and what matters is free. Many Internet users are very fond of this email service. Because in addition to easy to use, light loading, as well as Gmail capacity is being added automatically every day, so that the available capacity to store the mail is pretty big.

Also according to experience, almost all sites in cyberspace are receiving this email as a condition of their site membership registration. Another benefit of having Gmail, is to be used to create YouTube account, a member of the Google group, make Adsense account, registration at Google Analystics and others.

For how made, the first step is you have to get into the site Google search engine, Google.com. After that you will see the "Gmail" menu at top left.


Click the Gmail menu and you will enter into the Gmail sign in page. However, because not yet have a Gmail account, then you must first create one by enter to "Create an account" page, the button is at the bottom right.

Please complete your personal data on the page Create an account. Including specify your email first name that available, which will be combined with the suffix (last name) of Google email, which is @gmail.com.


In this example we give an example of using the name "michellegirl.00". This is one of uniqueness that is owned by Gmail, which permits the use . (dot) as the name of the email. So maybe you want to use your email name the same with name of your site, go ahead. For example yoursite.com@gmail.com.


Select your security question and answer, and do not forget to enter the verification word correctly. Once everything is complete please click the "I accept, create my account" button, at the bottom.

After that verification page will appear, verification number will be sent via telephone number. Fill in your country of origin and also your phone number, will be better if use a cellular phone number, because verification code will be sent directly in the form of short messages services. Format phone number is using the phone code number of your country. For example, the UK using country code (+44).

Then press "Send verification code to my mobile phone" button. You will receive your verification code directly, just a few seconds. Enter the number into the verification field. If so, click "Verify" as shown below.


If the verification is successful, then you will go to the "Introduction to Gmail" page. Here the picture of the page.


So, now you already have a Google email, or Gmail. Please enter your email page by clicking the button "Show me my account". And.. done!

Verify Paypal Account Without Credit Card

The need for a Paypal account verified, sometimes a problem for some people, including me, because I don't have a credit card at all. Because as is generally known, Paypal verification can only be done by credit card or VCC (Virtual Credit Card). But the following tips will help you to make your unverified Paypal became verify without using a credit card or VCC, and prove that such an assumption is not entirely correct.

Paypal account is very important for verification. The main reason is because not all sellers who accept payment by Paypal, will be willing to accept payment by unverified Paypal. Also if you can, according to information can only conduct transactions under $ 100.

So, how if you want to verify Paypal account but you don't have a credit card, and you also don't have the money to buy VCC (Virtual Credit Card)? Consider the following simple tips.

The first step is, prepare the document in the form of a file. If you do not have, you can do it in a way to scan documents and store them in a flash. Documents commonly required are as follows:

  • Identity card (ID).
  • The front page of your bank book, which contained the name, bank account number, and your address.
After that please contact Paypal via contact support or customer service paypal through your Paypal account, with the subject asks for help to verify your Paypal account. Or you can also try to directly send an email with the subject asks for help to verify Paypal, addressed to "webform@apac.paypal.com". Don't forget to complete the email with your document already prepared, as a file attachment. As the picture below.


After you send the email, you are just waiting for a reply from customer service Paypal. It is very important that you should remember is, make sure that when creating a Paypal account in accordance with existing data on the identity document and your bank account. If your email has been received by Paypal, then you will get an email reply like this.


Well, if everything is OK, then your Paypal account will be verified by Paypal. You would be happy to receive notification from Paypal via email, which contains the information that your Paypal account has been changed from unverified be verified, as below.


If your document still exist that are less suitable, probably Paypalwill ask you to complete other documents. And that often occur because of differences in the address written in the identity card with your address on Paypal. Anyway, if you have been able to make your Paypal account verified, I say congratulation for you!