


OPTION - 1
(update) Latest solution from Dynadot [click here]
My Account > Domains > Set Name Servers > DNS
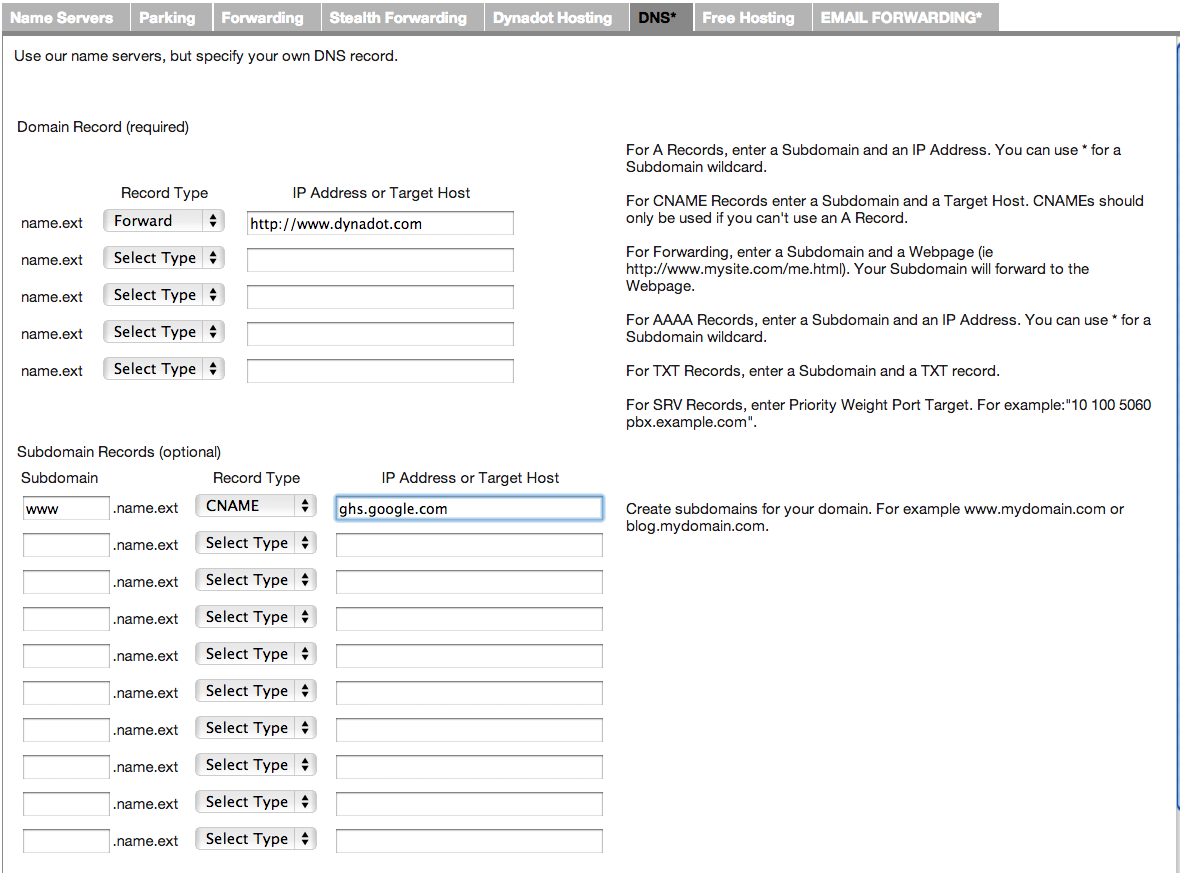
Choose Forward and type in your domain name with http://www. on the front, for example: http://www.domain.com
In subdomain, key in www and then choose CNAME and point it to ghs.google.com
Screenshot:
In your Blogger Dashboard > Settings > Publishing > type in your domain name with www. (www.domain.com)
If your domain is not redirecting to its www. address (when you visit a non www address), tick the redirection box.
Previously:
I know many people who bought their domain name from Dynadot had a really hard time setting it to work with Blogger.
You will only see your blog when you type in www. in front of your domain (eg. www.infotech.ws) but when you type it without www., you'll get a blank page instead.
The solution to that problem:
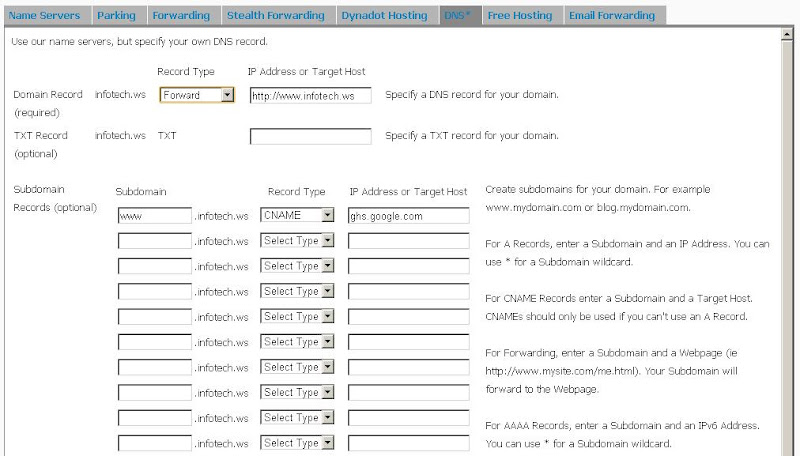
Choose your domain name and go to Name Server Settings. Then look under Advance Dynadot DNS.
In Domain Record, set Record Type to A and the IP Address to 72.14.207.121
Then in Subdomain Records, type in www at subdomain, set Record Type to CNAME and type in ghs.google.com at ip address. Lastly, click on Use Dynadot DNS button to confirm your changes. Here's an example:
Now at Blogger, set your custom domain under the Publishing tab and tick the redirect box below your domain name. Click on the following image:
 Wait a few hours (some times up to 48 hours) for the DNS to update and you should be able to access your blog when you type in your domain name with or without www.
OPTION - 2


(update) Latest solution from Dynadot [click here]
My Account > Domains > Set Name Servers > DNS
Choose Forward and type in your domain name with http://www. on the front, for example: http://www.domain.com
In subdomain, key in www and then choose CNAME and point it to ghs.google.com
Screenshot:
In your Blogger Dashboard > Settings > Publishing > type in your domain name with www. (www.domain.com)
If your domain is not redirecting to its www. address (when you visit a non www address), tick the redirection box.
Previously:
I know many people who bought their domain name from Dynadot had a really hard time setting it to work with Blogger.
You will only see your blog when you type in www. in front of your domain (eg. www.infotech.ws) but when you type it without www., you'll get a blank page instead.
The solution to that problem:
Choose your domain name and go to Name Server Settings. Then look under Advance Dynadot DNS.
In Domain Record, set Record Type to A and the IP Address to 72.14.207.121
Then in Subdomain Records, type in www at subdomain, set Record Type to CNAME and type in ghs.google.com at ip address. Lastly, click on Use Dynadot DNS button to confirm your changes. Here's an example:
Now at Blogger, set your custom domain under the Publishing tab and tick the redirect box below your domain name. Click on the following image:
Wait a few hours (some times up to 48 hours) for the DNS to update and you should be able to access your blog when you type in your domain name with or without www.OPTION - 2
Dynadot is the most recommended Domain registrar here at www.infotech.ws and because of that many of our followers use them, but we got a lot of messages from them asking for a solution to point the domains to blogger.
Many of those explanations that we found in the web are not complete, and because of that we did our tutorial to help.
So lets start.
1) Choose your domain name and click on the ”Name Server Settings for YOURDOMAIN.TLD” .
2) Then look under the “DNS” tab.
3) In “Domain Record (required)“, set “Record Type” to “A” and the “IP Address or Target Host” to 72.14.207.121
4) In “Subdomain Records (optional)“, type in www at “subdomain”
5) Set “Record Type” to “CNAME” and type in ghs.google.com at “Address or Target Host“.
6) At the end, click on “Use Dynadot DNS” button to confirm your changes.
You should have something like that :
Now go to Blogger and click on Settings -> Publishing -> Custom Domain -> Switch to advanced settings
Then enter your domain and the word verification
and click “Save Settings”
Wait for a while the DNS changes and after that you can access your blog with your own domain name.
 Posted in:


