


Here I explain step by about tips to create Adsense for Domains ads, complete with domain settings at Namecheap. This domain hosting is not a must, you can customize with your own domain hosting. I give examples of the settings on Namecheap, because that's where my hosting domain, that's why! How to setting is similar with other domain hosting, you just need to adjust it.
As we know, one of the products of Google AdSense's advertising services is AdSense for Domains. The workings of AdSense for Domains is to utilize our unused domain, to be filled with AdSense ads. So in essence, our domain does not need to contain anything (for example article post), just enough with the domain name is not used it. Thus, a domain that is not useful can be useful to make money through AdSense for Domains ads.
Step making AdSense for Domains
The main requirement of course you must have a domain that is not used in a domain hosting service. In addition you must also have an Adsense account. The first step you should do is login into your Adsense account and go to the Adsense for Domains menu, in the "Adsense Setup" -> "Get ads", like the picture below.

Then enter your domain name in the column that has been provided. Enter the domain name without http:// or www. If you enter multiple domains, for every one line, enter one domain name only. Or you can also use a comma (,) to separate your domain with each other. Also do not forget to select the language of your domain.
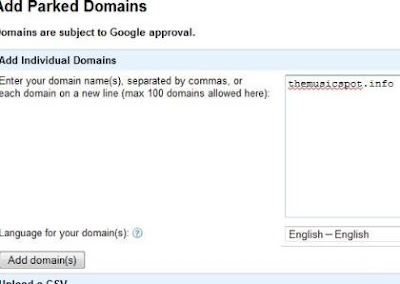
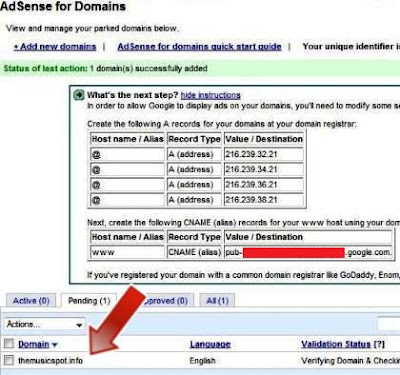
After that click on the "Add Domain(s)" button and will appear information page about the domain successfully added and instructions on setting you have to do in your domain hosting service. While at the bottom will look your domain name you entered was already in the record. As the picture below.
For a while setting your Adsense for Domains has been completed. The next step is to set DNS server in your domain hosting service. Next I will cite the settings on the Namecheap. If your domain hosting service is different, you can customize it yourself.
Setting up DNS Server on domain hosting service
As I said before, in this example I will give examples for setting the DNS server on Namecheap. First, please log in into your Namecheap account, then choose the menu "Domain" -> "Manage Domain". Then click on the domain name would you use for AdSense for Domains. After that look at the column on the left, and select the menu "Transfer DNS to webhost", or if that menu not show, there will be another menu called "Domain Name Server Setup".
Fill out your DNS servers with DNS servers from Google for AdSense for Domains as follows in the following manner.

Setting up DNS Servers of AdSense for Domains above is easiest way. You do not need to enter a CNAME (Alias) or Record type. Quite simply by using Google's own DNS servers, it is definitely Adsense will be able to detect your settings.
Now, all your settings are complete. You can simply check the results of your settings in your AdSense for Domains account. If your setting is correct, then the domain status is pending, as shown below.
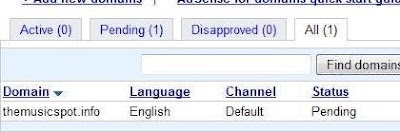
Google AdSense does not directly approve all domains are registered for the AdSense for Domains. They should be verified first, to make sure the domain is approved or not. If it does not contain pornography, violence, gambling or other illegal things, then your domain will be approved by Google Adsense, and the status of your domain will "Active" as shown below.

Well, congratulations because now you can use your unused domain become an extra income by AdSense for Domains.
As we know, one of the products of Google AdSense's advertising services is AdSense for Domains. The workings of AdSense for Domains is to utilize our unused domain, to be filled with AdSense ads. So in essence, our domain does not need to contain anything (for example article post), just enough with the domain name is not used it. Thus, a domain that is not useful can be useful to make money through AdSense for Domains ads.
Step making AdSense for Domains
The main requirement of course you must have a domain that is not used in a domain hosting service. In addition you must also have an Adsense account. The first step you should do is login into your Adsense account and go to the Adsense for Domains menu, in the "Adsense Setup" -> "Get ads", like the picture below.

Then enter your domain name in the column that has been provided. Enter the domain name without http:// or www. If you enter multiple domains, for every one line, enter one domain name only. Or you can also use a comma (,) to separate your domain with each other. Also do not forget to select the language of your domain.

After that click on the "Add Domain(s)" button and will appear information page about the domain successfully added and instructions on setting you have to do in your domain hosting service. While at the bottom will look your domain name you entered was already in the record. As the picture below.

For a while setting your Adsense for Domains has been completed. The next step is to set DNS server in your domain hosting service. Next I will cite the settings on the Namecheap. If your domain hosting service is different, you can customize it yourself.
Setting up DNS Server on domain hosting service
As I said before, in this example I will give examples for setting the DNS server on Namecheap. First, please log in into your Namecheap account, then choose the menu "Domain" -> "Manage Domain". Then click on the domain name would you use for AdSense for Domains. After that look at the column on the left, and select the menu "Transfer DNS to webhost", or if that menu not show, there will be another menu called "Domain Name Server Setup".
Fill out your DNS servers with DNS servers from Google for AdSense for Domains as follows in the following manner.
- ns1.googleghs.com
- ns2.googleghs.com
- ns3.googleghs.com
- ns4.googleghs.com

Setting up DNS Servers of AdSense for Domains above is easiest way. You do not need to enter a CNAME (Alias) or Record type. Quite simply by using Google's own DNS servers, it is definitely Adsense will be able to detect your settings.
Now, all your settings are complete. You can simply check the results of your settings in your AdSense for Domains account. If your setting is correct, then the domain status is pending, as shown below.

Google AdSense does not directly approve all domains are registered for the AdSense for Domains. They should be verified first, to make sure the domain is approved or not. If it does not contain pornography, violence, gambling or other illegal things, then your domain will be approved by Google Adsense, and the status of your domain will "Active" as shown below.

Well, congratulations because now you can use your unused domain become an extra income by AdSense for Domains.
 Posted in:


